I'll be gone for a couple of days
Queridas amigas, desaparecere por un par de dias, pues este blog increiblemente lo he estado escribiendo desde una habitacion de hotel en Las Vegas... hoy por fin celebro que tengo una casa a donde mudarme. Estare desconectada por un par de dias mientras me encargo de la mudanza, en cuanto estemos instalados, continuare con el blog. Gracias por esperar...
Y A MI AMIGA JEANETTE, GRACIAS POR UNIRTE AL GRUPO !
Dear friends, I will be gone for a couple of days. Incredibly, I have been posting to this blog from a hotel room in wonderful Las Vegas... today at last my family and I celebrate that we have a house to move into! I will be disconnected for a couple of days while I take care of the moving, but as soon as we are settled, I will continue with my blog. Thank you for your patience...
TO MY FRIEND JEANETTE, THANK YOU SO MUCH FOR JOINING MY GROUP!
Tuesday, August 18, 2009
Saturday, August 15, 2009
Cuidado del Ambiente - Verter (Vaciar, Trasvasijar)
Care of the Environment - Pouring

Vamos a comenzar con unos ejercicios basicos para verter, (o, dependiendo del pais, diriamos vaciar/trasvasijar).
El orden para verter (vaciar, trasvasijar) es:
We will begin with basic pouring exercises.
The order for pouring exercices is:
VERTER SOLIDOS / POUR SOLIDS

Materiales / Materials
1 Charola / 1 Tray
2 Jarritas pequenas / 2 small pitchers
Arroz (o algun otro grano, se creativa) / Rice (or any other grains, be creative)
Pasos / Steps
1. Invita al nino a trabajar con la actividad y ensenale el nombre del ejercicio: "Hoy vamos a trabajar con este ejercicio. Vamos a verter (vaciar, trasvasijar) arroz".
1. Invite the child to work with you, and name the activity. Say "today we're going to work with the Pouring Rice exercise"
2. Lleva la charola con los materiales a la mesa, y pide al nino que se siente al lado tuyo y te observe calladamente mientras le das la presentacion. Pidele que ponga sus manos sobre sus piernas.
2. Take the tray with the materials to a table, and ask the child to sit right next to you and observe you quietly while you present the exercise. Ask him/her to put his/her hands on his/her lap.
3. Toma la jarra del arroz con la mano dominante (derecha, si eres diestra, izquierda si eres zurda)
3. Take the pitcher with the rice with your dominant hand (right if you're right-handed, with your left if you're left-handed)
4. Lentamente pon tu otra mano justo debajo de la boquilla de la jarra, para sujetarla mejor, y con mucho cuidado, con movimientos lentos, empieza a vaciar el arroz a la jarra vacia.
4. Slowly put your other hand under the spout of the pitcher, for better support, and very carefully, with slow movements, begin pouring the rice into the empy pitcher.
Observa el movimiento correcto:
Observe the correct movement:

5. Procura que no se tire ningun grano fuera de la jarra. Tus movimientos deben ser lentos, exagerados, cuidadosos, y completamente en silencio. El nino aprende mas de tus movimientos, que de tus palabras.
5. Try not to spill any grain outside of the pitcher. Your movements must be slow, exaggerated, careful, and completely silent. Your child will learn more from your movements than from your words.
6. Si por alguna razon se tira el arroz fuera de la jarra, detente, recoge hasta el ultimo grano de arroz y devuelvelo a la jarra, y luego continua. No permitas que el nino siga trabajando sin antes haber recogido todo el arroz, asi le ensenaras orden.
6. If for any reason you or the child spill rice, stop, pick up every last grain of rice and put it in the pitcher, then continue pouring. Do not allow the child to continue until he has picked up all the rice, that way you will be teaching him neatness.
7. Deja que el nino lo intente tan pronto como el nino este listo y cuantas veces quiera. Recuerda que no debes corregirlo, es muy importante. Deja que el lo intente aunque no lo haga perfectamente, con practica, lo hara correctamente. Repite la presentacion la proxima vez, si crees que el nino la necesita de nuevo.
7. Let the child try it as soon as the child feels he/she is ready and for as many times as the child wants. Remember not to correct him, this is very important. Let him do it even if it is not perfect, with practice, he/she will do it right. Repeat the presentation again next time if you feel the child needs it.
8. El ultimo paso es observar el trabajo terminado, y luego llevar todo de vuelta al sitio que corresponde, que normalmente suele ser en una estanteria o en algun lugar especifico de la casa. Dile al nino que puede trabajar con este ejercicio cuando el lo desee, pero que debe regresarlo al mismo sitio para encontrarlo siempre alli. Nunca se deben dejar los materiales en la mesa donde se ha estado trabajando.
8.. The last step is to observe the finished work, and take everything back to its place, which shoud be on a shelve, or in a special part of your house. Tell your child he/she can work with the exercise whenever he/she wishes, but he/she needs to put it back every time. Never leave the materials on the table where you've been working.
Siempre practica el ejercicio antes de dar la presentacion al nino. Espero que te haya gustado, y que lo practiques con tu hijo ya mismo. DEJAME TUS COMENTARIOS, DEJA TUS PREGUNTAS O DIME QUE DESEAS APRENDER.
Estare esperando!
Always practice the exercise and master it before presenting it to the child. I hope you liked the exercise and you work with your child right away. LEAVE ME YOUR COMMETS, ASK ME QUESTIONS OR TELL ME WHAT YOU NEED TO LEARN.
I'll be waiting!
En el proximo blog aprenderemos a verter liquidos, eso es todo por hoy.;)
On my next blog we will learn to pour liquids. That's all for now! ;)

Vamos a comenzar con unos ejercicios basicos para verter, (o, dependiendo del pais, diriamos vaciar/trasvasijar).
El orden para verter (vaciar, trasvasijar) es:
- Verter solidos (como arroz, pastas pequenas, lentejas, o semillas)
- Verter liquidos (como agua, se puede utilizar colorante comestible para hacerlo mas interesante).
- Verter liquidos utilizando instrumentos, o utilizando varios recipientes.
We will begin with basic pouring exercises.
The order for pouring exercices is:
- Pouring Solids (like rice, small pasta, lentils or beans)
- Pouring liquids (like water, you may use vegetable coloring to make it more interesting).
- Pouring from one to many containers or using instruments.
*********************************
VERTER SOLIDOS / POUR SOLIDS

Materiales / Materials
1 Charola / 1 Tray
2 Jarritas pequenas / 2 small pitchers
Arroz (o algun otro grano, se creativa) / Rice (or any other grains, be creative)
Pasos / Steps
1. Invita al nino a trabajar con la actividad y ensenale el nombre del ejercicio: "Hoy vamos a trabajar con este ejercicio. Vamos a verter (vaciar, trasvasijar) arroz".
1. Invite the child to work with you, and name the activity. Say "today we're going to work with the Pouring Rice exercise"
2. Lleva la charola con los materiales a la mesa, y pide al nino que se siente al lado tuyo y te observe calladamente mientras le das la presentacion. Pidele que ponga sus manos sobre sus piernas.
2. Take the tray with the materials to a table, and ask the child to sit right next to you and observe you quietly while you present the exercise. Ask him/her to put his/her hands on his/her lap.
3. Toma la jarra del arroz con la mano dominante (derecha, si eres diestra, izquierda si eres zurda)
3. Take the pitcher with the rice with your dominant hand (right if you're right-handed, with your left if you're left-handed)
4. Lentamente pon tu otra mano justo debajo de la boquilla de la jarra, para sujetarla mejor, y con mucho cuidado, con movimientos lentos, empieza a vaciar el arroz a la jarra vacia.
4. Slowly put your other hand under the spout of the pitcher, for better support, and very carefully, with slow movements, begin pouring the rice into the empy pitcher.
Observa el movimiento correcto:
Observe the correct movement:

5. Procura que no se tire ningun grano fuera de la jarra. Tus movimientos deben ser lentos, exagerados, cuidadosos, y completamente en silencio. El nino aprende mas de tus movimientos, que de tus palabras.
5. Try not to spill any grain outside of the pitcher. Your movements must be slow, exaggerated, careful, and completely silent. Your child will learn more from your movements than from your words.
6. Si por alguna razon se tira el arroz fuera de la jarra, detente, recoge hasta el ultimo grano de arroz y devuelvelo a la jarra, y luego continua. No permitas que el nino siga trabajando sin antes haber recogido todo el arroz, asi le ensenaras orden.
6. If for any reason you or the child spill rice, stop, pick up every last grain of rice and put it in the pitcher, then continue pouring. Do not allow the child to continue until he has picked up all the rice, that way you will be teaching him neatness.
7. Deja que el nino lo intente tan pronto como el nino este listo y cuantas veces quiera. Recuerda que no debes corregirlo, es muy importante. Deja que el lo intente aunque no lo haga perfectamente, con practica, lo hara correctamente. Repite la presentacion la proxima vez, si crees que el nino la necesita de nuevo.
7. Let the child try it as soon as the child feels he/she is ready and for as many times as the child wants. Remember not to correct him, this is very important. Let him do it even if it is not perfect, with practice, he/she will do it right. Repeat the presentation again next time if you feel the child needs it.
8. El ultimo paso es observar el trabajo terminado, y luego llevar todo de vuelta al sitio que corresponde, que normalmente suele ser en una estanteria o en algun lugar especifico de la casa. Dile al nino que puede trabajar con este ejercicio cuando el lo desee, pero que debe regresarlo al mismo sitio para encontrarlo siempre alli. Nunca se deben dejar los materiales en la mesa donde se ha estado trabajando.
8.. The last step is to observe the finished work, and take everything back to its place, which shoud be on a shelve, or in a special part of your house. Tell your child he/she can work with the exercise whenever he/she wishes, but he/she needs to put it back every time. Never leave the materials on the table where you've been working.
Siempre practica el ejercicio antes de dar la presentacion al nino. Espero que te haya gustado, y que lo practiques con tu hijo ya mismo. DEJAME TUS COMENTARIOS, DEJA TUS PREGUNTAS O DIME QUE DESEAS APRENDER.
Estare esperando!
Always practice the exercise and master it before presenting it to the child. I hope you liked the exercise and you work with your child right away. LEAVE ME YOUR COMMETS, ASK ME QUESTIONS OR TELL ME WHAT YOU NEED TO LEARN.
I'll be waiting!
En el proximo blog aprenderemos a verter liquidos, eso es todo por hoy.;)
On my next blog we will learn to pour liquids. That's all for now! ;)
Ejercicios de la Vida Practica
Practical Life Exercises

QUE SON LOS EJERCICIOS DE VIDA PRACTICA?
Los ejercicios de Vida Practica son aquellos que ayudan al nino a ser mas independiente, y tienen que ver con el cuidado de su persona, de su entorno, modales y buenas costumbres, y reglas sociales. El proposito es que el nino adquiera auto-estima, y sea un miembro util del grupo en el que vive y de su sociedad.
Cada una de las actividades de la Vida Practica tiene un doble proposito, pues mietras se le ensenan al nino actividades de la vida diara, a la vez tambien se desarrollan otras funciones como la coordinacion viso-motora, aumentar la concentracion, y trabajar ordenadamente siguiendo paso a paso una secuencia. Se puede encontrar un excelente articulo en espanol en este link: Articulo sobre Vida Practica.
WHAT ARE EXERCISES OF PRACTICAL LIFE?
Exercises of Practical Life are those designed to help the child become more independent, and they involve the care of self, care of the environment, good manners, and social skills. The purpose or these exercises is to develope self esteem, and to help the child be a contributing member of the group he lives in and of society.
Each one of the exercises in Practical Life has a double purpose, while the child is learning to do day-to-day activities, he/she is learning at the same time eye-hand coordination, longer attention spans, and working step-by-step in sequence.
You can find an excellent article about this topic in the following link: The Purpose of Practical Life.
En el siguiente blog les mostrare un ejercicio de la Vida Practica muy facil de practicar en casa.
On my next blog I will show you a very simple Practical Life exercise that you can do at home.
Friday, August 14, 2009
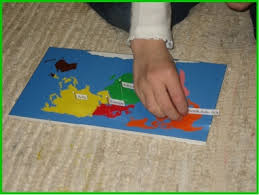
Los Continentes - Extension 1
The Continents - Extension 1

Despues de haber terminado nuestros continentes, y de haber aprendido los nombres, trabajaremos con el nino para que haga su propio mapa. No se debe hacer el mapa antes de que el nino aprenda sus continentes, primero, porque se debe terminar cada trabajo antes de iniciar uno nuevo, y segundo, porque el hacer el mapa sera un incentivo para que el nino aprenda sus continentes. Una vez aprendido todo... manos a la obra!
After finishing our continents map, and after learning the names of the continents, we will work with our child on making his/her very own map. You should not work on your map before learning the continents, first: because you should teach the child to finish one work before starting a new one; and second: because this will be an incentive for the child to learn his/her continernts. Once the names have been learned... let's begin working on our map!!!!
 1. Materiales / Materials:
Papel en blanco para trazar el mapa
Blank paper to trace the map
Pinturas de colores para pintar los continentes y los oceanos
Color paints and brush to color the map
Pegatinas adhesivas (stickers) para hacer las etiquetas con los nombres
Stickers to write the names of the continents
2. Instrucciones / Instructions:
a) Traza los continentes en el papel, si quieres hacer el proceso mas facil, simplemente imprimelos en el siguiente link:
Trace the continents on the paper, to make the process easier, simply print the map on the following link:
Continentes Mapa / Continents map

b) Una vez que termines de trazar los continentes, o que imprimas el mapa, deja que el nino lo pinte con las pinturas correctas. Si es un mapa pequeno, procura que la mesa o el piso donde se pinta este protegido con un mantel de plastico por debajo o papel periodico.
Once the map has been traced, or printed, let the child paint it with the right colors. If it is a small map, protect your table of floor with a vinyl mat underneath or newspapers.

c) El ultimo paso es preparar las etiquetas para el mapa. Escribe los nombres de los continentes en las pegatinas, y pide al nino que las coloque en el continente correcto. No lo hagas tu, el nino debe saber colocarlas. Dale ayuda solo si te la pide.
The last step is to prepare labels for the map. Write the names of all the continets on the labels, read the label to the child and let him/her put the label on the right continent. Do not offer help unless the child needs it. He/She should be able to recognize all the continents.
El mapa esta terminado !!! Observa la cara de satisfaccion de la nena... por supuesto, lo ha hecho todo ella solita ! Y yo, esta claro que soy una madre super-orgullosa ;)
The map is finished !!! Note the satisfaction in her little face ... of course, she has done it all by her little self! And I am clearly a super-proud mom ;)

Hasta la proxima!
See you next time!
Traducido por: Sandra Candel
Text translated by: Sandra Candel
Thursday, August 13, 2009
Los Continentes / The Continents

Este es un ejercicio que pueden empezar a hacer con el nino y que no requiere de materiales caros, solo requiere de un poco de imaginacion y creatividad.
This is an exercise you can practice with your child, and you do not need expensive materials, just a little imagination and creativity.
En clase los ensenamos con la ayuda de un mapa de madera en forma de rompecabezas, donde el nino puede manipular el rompecabezas (puzzle) mientras aprende los nombres.
In class, we teach this with a wooden puzzle map, where the child can manupulate it at will while learning the names of the continents
Si no cuentas con uno, puedes hacerlo con trozos de franela, y guardarlos en una pequena cesta. Para ver el proceso visita:
If you do not have one, you can make one out of felt pieces, and store them in a little basket. To see the process visit:
Continent Felt Map
el sitio esta escrito en ingles, asi que repetiremos los pasos:
for the English version, please follow the steps on the above link. The rest will be in Spanish. We'll meet after we have completed our felt continent map! ;)
- COMO HACER EL MAPA CON FRANELA
- HOW TO MAKE THE MAP WITH FELP (For English instructions please go to above link, when finished, go down to the next topic CONTINETS LESSON)
1. En la seccion de manualidades de cualquier tienda (Walmart, por ejemplo) busca trozos de franela de los siguientes colores:
Azul (2 piezas) para los oceanos, Rojo (1 pieza) para Europa, Amarillo (1 pieza) para Asia, Verde (1 pieza) para Africa, Rosa (1 pieza) para Sudamerica, Naranja (1 pieza) para Norteamerica, Cafe o Marron (1 pieza) para Austrialia, Blanco (1 pieza) para Antartica

2. Luego abre este link e imprime o copia este mapa de los continentes:
Mapa de los continentes

3. Utilizando el mapa como patron, recorta cada continente con el color de franela correcto. El resultado debe quedar mas o menos asi:

- LA LECCION DE LOS CONTINENTES
- THE CONTINENTS' LESSON
1. Elige el sitio donde vayas a trabajar, en una mesa o en el piso, sobre una toalla o un tapete. Esta sera tu area de trabajo.
Pick a spot where you can work, it can be on a table or on the floor using a towel or mat. This will be your work area.
2. Empieza por mostrar el nombre de 2 o 3 continentes a la vez utilizando la leccion en tres tiempos como te lo estoy mostrando. Por ejemplo: escoge Norteamerica, Africa y Europa.
Start by teaching the name of two or three continents using the trhee-period lesson as I will show you. For example: pick North America, Africa, and Europe.
3. Ensena al nino a decir el nombre, levanta el continente y muestraselo mientras le dices: "Este es Norteamerica, repite conmigo, NORTEAMERICA" luego de repetirlo 2 o 3 veces, devuelves el continente a su sitio y levantas Africa, mientras se lo muestras ensenale el nombre: "Este es Africa" repitelo unas cuantas veces, luego devuelvelo a su sitio. Y asi susesivamente.
Teach the child how to say the name of the continent by picking it up while you tell him/her: "This is North America, repeat with me, NORTH AMERICA" after you say it 2 or 3 times put it back and pick up Africa, show the name: "This is Africa" have him/her repeat several times and put it down. Repeat the process for the remaining continents.

4. Deja que el nino manipule los continentes dejando que los ponga en su sitio correcto y armando el rompecabezas. Es una buena idea que tengas una muestra para que el pueda ver el sitio correcto. Te recomiendo que imprimas otra vez el mapa de los continentes en el link que te he dado antes, y esta vez colorealo para que quede como muestra. De esta manera el nino no necesitara de tu ayuda, sino que podra guiarse solito mediante el mapa. !EVITA CORREGIRLO! solo observalo, con la practica lo hara correctamente.
Let the child manipulate the continents by letting him/her put them in their correct places and working with the puzzle. It's a good idea to have a "master" map, so that the child can see where every continent goes. I recommend printing an extra copy of the continents outline from my link above, and color it neatly with the correct continent colors so the child has a sample. This way the child won't need your help, but he will be able to work independently. DO NOT CORRECT HIM/HER! just observe, with practice, he will do it correctly.
5. Repite la leccion tantas veces como sea necesario hasta que el nino haya aprendido el nombre de los continentes. Puede tomar dias o incluso semanas. No te preocupes, respeta los tiempos de tu nino.
Repeat this lesson as many times as necessary until the child learns all the continents' names. It can take days or weeks. Do not worry, respect your child's pace.
Tienes preguntas??? No dudes en ponerlas en el blog publicamente, busca la seccion de comentarios y publicalas, o contactame directamente por medio de un email. Mis datos estan en mi perfil, debajo de mi foto. Espero tus comentarios, dudas, o preguntas.
Got questions??? Post them on the blog, look for the "Comments" link and post them there, or contact me by email. My address is in my profile, under my picture. Post your comments and/or questions... I'll be waiting!
Este proyecto te tomara algunos dias completarlo antes de que puedas trabajar con tu nino. En mi proximo blog the mostrare la cancion de los continentes, y otras extensiones a este ejercicio, esperalo... se que te gustara!
This project will take a few days to complete before you are able to work with your child. On my next blog I will show you the continents' song and other extensions to this exercise. Expect it soon...I know you will enjoy it!
Parte del texto y de las fotos extraidas de: www.montessorisecrets.com
Part of the text and pictures extracted from www.montessorisecrets.com
Wednesday, August 12, 2009
Montessori: una forma distinta de ver la educacion
Montessori: a different approach to aducation

“Nunca hay que dejar que el niño se arriesgue a fracasar
hasta que tenga una oportunidad razonable de triunfar”.
"Never let the child risk failure until he has a reasonable chance to succeed".
MARIA MONTESSORI

El método Montessori es una forma distinta de ver la educación. Busca que el niño o niña pueda sacar a luz todas sus potencialidades a través de la interacción con un ambiente preparado, rico en materiales, infraestructura, afecto y respeto.
The Montessori method is a different approach to education. Its goal is that children can shine to their fullest potential through their interaction with a prepared environment, rich in beautiful materials, a nice infrastructure, warmth and respect.

El ambiente Montessori potencia todas las áreas del desarrollo: las ciencias, las matemáticas, el lenguaje, el arte, el desarrollo motor, entre otros. Pero a su vez, en igual importancia son parte del fundamento educativo, la convivencia con los otros, las habilidades sociales, el desarrollo de la autoestima, los hábitos de orden, perseverancia, concentración, amor por el trabajo, autonomía, liderazgo, entre muchos más.
The Montessori environment promotes all areas of development: science, math, language, art, motor skills, etc. But at the same time, the social aspects are equally important, like the interaction with other children, social skills and good manners, self-esteem, order, patience, concentration, love of work, autonomy and independence, and leadership, among many others.

Principios basicos: Basic Principles:
• Lo más importante es motivar a los niños a aprender con gusto y permitirles satisfacer la curiosidad y experimentar el placer de descubrir ideas propias en lugar de recibir los conocimientos de los demás.
• The most important principle is to motivate children to learn freely and happily, and to allow them to experiment and be curious about their world, instead of giving them knowledge externally.
• Permitir que el niño encuentre la solución de los problemas, y no intervenir a menos que sea muy necesario.
• To allow the child to find find his/her own solutions to problems, and not to intervene unless absolutely necessary.
• Darle a cada niño la oportunidad de satisfacer sus potencialidades para que sea un ser humano independiente, seguro y equilbrado.
• To give the child the opportunity to explore his/her potential so that he/she becomes a well-rounded human being, independent, confident and well balanced.
• Otro de sus conceptos innovadores fue que cada niño marca su propio paso o velocidad para aprender y esos tiempos hay que respetarlos.
• Another valuable concept is the idea that each child learns at his/her own pace, and this pace has to be respected.
Extraido de: http://rie.cl/?a=5250
Extracted from: http://rie.cl/?a=5250
“Nunca hay que dejar que el niño se arriesgue a fracasar
hasta que tenga una oportunidad razonable de triunfar”.
"Never let the child risk failure until he has a reasonable chance to succeed".
MARIA MONTESSORI

El método Montessori es una forma distinta de ver la educación. Busca que el niño o niña pueda sacar a luz todas sus potencialidades a través de la interacción con un ambiente preparado, rico en materiales, infraestructura, afecto y respeto.
The Montessori method is a different approach to education. Its goal is that children can shine to their fullest potential through their interaction with a prepared environment, rich in beautiful materials, a nice infrastructure, warmth and respect.

El ambiente Montessori potencia todas las áreas del desarrollo: las ciencias, las matemáticas, el lenguaje, el arte, el desarrollo motor, entre otros. Pero a su vez, en igual importancia son parte del fundamento educativo, la convivencia con los otros, las habilidades sociales, el desarrollo de la autoestima, los hábitos de orden, perseverancia, concentración, amor por el trabajo, autonomía, liderazgo, entre muchos más.
The Montessori environment promotes all areas of development: science, math, language, art, motor skills, etc. But at the same time, the social aspects are equally important, like the interaction with other children, social skills and good manners, self-esteem, order, patience, concentration, love of work, autonomy and independence, and leadership, among many others.
Principios basicos: Basic Principles:
• Lo más importante es motivar a los niños a aprender con gusto y permitirles satisfacer la curiosidad y experimentar el placer de descubrir ideas propias en lugar de recibir los conocimientos de los demás.
• The most important principle is to motivate children to learn freely and happily, and to allow them to experiment and be curious about their world, instead of giving them knowledge externally.
• Permitir que el niño encuentre la solución de los problemas, y no intervenir a menos que sea muy necesario.
• To allow the child to find find his/her own solutions to problems, and not to intervene unless absolutely necessary.
• Darle a cada niño la oportunidad de satisfacer sus potencialidades para que sea un ser humano independiente, seguro y equilbrado.
• To give the child the opportunity to explore his/her potential so that he/she becomes a well-rounded human being, independent, confident and well balanced.
• Otro de sus conceptos innovadores fue que cada niño marca su propio paso o velocidad para aprender y esos tiempos hay que respetarlos.
• Another valuable concept is the idea that each child learns at his/her own pace, and this pace has to be respected.
Extraido de: http://rie.cl/?a=5250
Extracted from: http://rie.cl/?a=5250
Un blog en Espanol e Ingles / A Spanish-English Blog

Siempre habia sonado con compartir mis conocimientos con otras madres y/o personas interesadas en el metodo Montessori. He querido hacerlo en Ingles y Espanol, ya que no contamos con muchos sitios dedicados a este tema en nuestro bello idioma. Hoy mi sueno se ha materializado. Espero lo disfruten y les sirva de inspiracion. Es un placer compartirlo con ustedes...
My dream has always been to share my knowledge with other moms and/or people interested in the Montessori method. I have chosen to post it in English and Spanish, because there are not a lot of blogs in Spanish, my beautiful mother tongue. Today, my dream has finally come true. I hope you enjoy its contents, and you find it inspirational. It is a pleasure sharing my knowledge with you...
Mi pequena escuelita (LENGUAJE)

Esta es el area de Lenguaje de mi pequena escuelita, aqui los ninos aprenden paso a paso la lectura y escritura. Poco a poco ire describiendo los materiales utilizados, se empieza por los mas sencillos y se va avanzando el grado de dificultad; de lo abstracto a lo concreto. La idea es hacerlos lo mas atractivo posibles...
This is the Language shelf at my little school. Here children learn step-by-step how to read and write. Later, I will be describing the materials used in this shelf, from the most simple, to the most complicated; from the abstract to the concrete. The goal is to make these materials attractive and irresistible to the child.
Subscribe to:
Posts (Atom)


